4.3.2.5 QuickPay Text
The QuickPay Text section allows you to set a message to the customer and display information from the database to them about the account they have entered to ensure that it is their account.
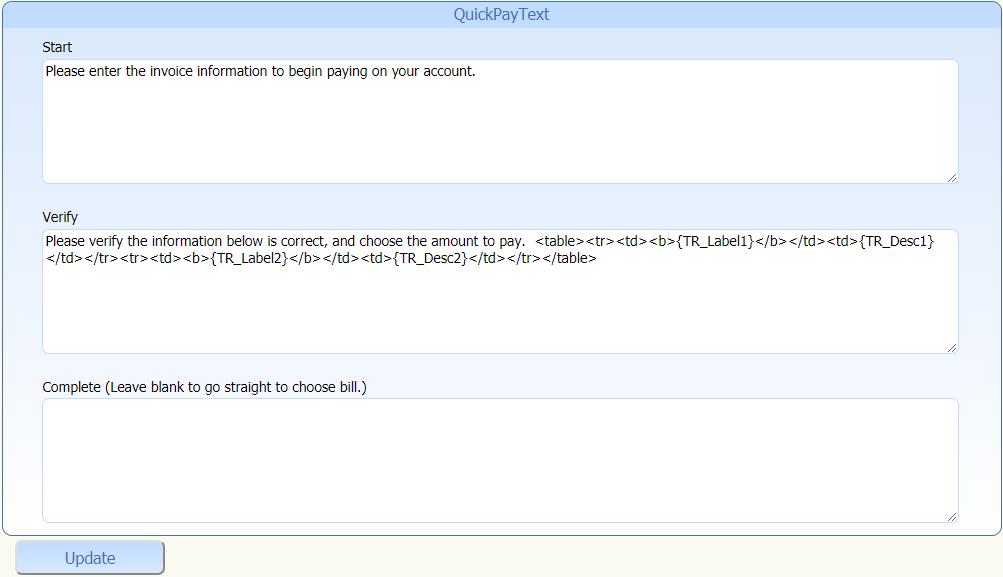
- Start
- The Start area allows you to set up a custom message for your customers to see with the verification text.
- Verify
- The Verify area allows you to create a customized display of information for your customers to see before they link their account to their Online Bill Payment profile. This section uses HTML to display the items in a table. Data in the table is displayed using the variables in the Variables Available for Verify Text section above.
- Complete
- The Complete section if left blank will take the customer directly to the bill summary page. If you place text in the Complete area the message will be displayed prior to the customer being directed to the bill summary page.
Click here to see more information.
The HTML included in the section above creates a
table that will look like:
| Parcel Number | 31G 1 27 |
| Location | 123 Main Street |
Where the values for the parcel number and location are pulled from the database values for the variables:
- {TR_Label1}
- {TR_Desc1}
- {TR_Label2}
- {TR_Desc2}
The HTML looks like:
    <table class="data"><tr><td>{TR_Label1}</td><td>{TR_Desc1}</td></tr>
        <tr><td>{TR_Label2}</td><td>{TR_Desc2}</td></tr></table>
Which is difficult to read, an easier way to look at the HTML would be to reformat it like:
    <table class="data">
        <tr>
            <td>{TR_Label1}</td>
            <td>{TR_Desc1}</td>
        </tr>
        <tr>
            <td>{TR_Label2}</td>
            <td>{TR_Desc2}</td>
        </tr>
    </table>
This allows you to see the way that the HTML codes are set up. The tag <table class="data"> creates the table itself. The <tr> tag creates a row in the table. The <td> tags create cells in the row. As you can see there are two cells created in each of the two rows. For each tag there is a closing tag for the cell in the row the closing tag is </td> for the row it is </tr> and for the table it is </table>.
If you wanted to add in the acreage for the parcel number, it could easily be done by adding another row to the table and use the variable {TR_Label4} and the associated {TR_Desc4} to show that value on the screen. For example:
    <table class="data">
        <tr>
            <td>{TR_Label1}</td>
            <td>{TR_Desc1}</td>
        </tr>
        <tr>
            <td>{TR_Label2}</td>
            <td>{TR_Desc2}</td>
        </tr>
        <tr>
            <td>{TR_Label4}</td>
            <td>{TR_Desc4}</td>
        </tr>
    </table>
Which would produce the following:
| Parcel Number | 31G 1 27 |
| Location | 123 Main Street |
| Acres | 2.18 |